So far, all of this chapter’s examples have operated on a single DataTable object. However, the power of the disconnected layer shines through when a DataSet object contains numerous interrelated DataTables. In this case, you can define any number of DataRelation objects in the DataSet’s DataRelation collection to account for the interdependencies of the tables. The client tier can use these objects to navigate between the table data without incurring network roundtrips.
Note Rather than updating AutoLotDAL.dll to account for the Customers and Orders tables, this example isolates all of the data access logic within a new Windows Forms project. However, intermixing UI and data logic in a production-level application is not recommended. The final examples of this chapter leverage various database design tools to decouple the UI logic from the data logic code.
Begin this example by creating a new Windows Forms application named MultitabledDataSetApp. The GUI is simple enough. In Figure 22-11, you can see three DataGridView widgets (dataGridViewInventory, dataGridViewCustomers, and dataGridViewOrders) that hold the data retrieved from the Inventory, Orders, and Customers tables of the AutoLot database. In addition, the initial Button (named btnUpdateDatabase) submits any and all changes entered within the grids back to the database for processing using data adapter objects.
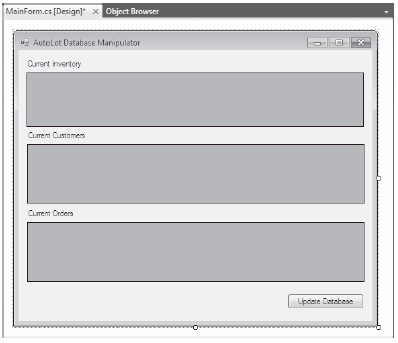
Figure 22-11 The initial UI will display data from each table of the AutoLot database
To keep the data access code as simple as possible, the MainForm will make use of command builder objects to autogenerate the SQL commands for each of the three SqlDataAdapters (one for each table). Here is the initial update to the Form-derived type (don’t forget to import the System.Data.SqlClient namespace):
public partial class MainForm : Form
{
    // Form wide DataSet.
    private DataSet autoLotDS = new DataSet("AutoLot");

    // Make use of command builders to simplify data adapter configuration.
    private SqlCommandBuilder sqlCBInventory;
    private SqlCommandBuilder sqlCBCustomers;
    private SqlCommandBuilder sqlCBOrders;

    // Our data adapters (for each table).
    private SqlDataAdapter invTableAdapter;
    private SqlDataAdapter custTableAdapter;
    private SqlDataAdapter ordersTableAdapter;

    // Form wide connection string.
    private string cnStr = string.Empty;
...
}
The constructor does the grunt work of creating your data-centric member variables and filling the DataSet. This example assumes you have authored an App.config file that contains the correct connection string data (and that you have referenced System.Configuration.dll and imported the System.Configuration namespace), as in this example:
<configuration>
    <connectionStrings>
        <add name ="AutoLotSqlProvider" connectionString =
            "Data Source=(local)\SQLEXPRESS;
            Integrated Security=SSPI;Initial Catalog=AutoLot"
        />
    </connectionStrings>
</configuration>
Also note that you include a call to a private helper function, BuildTableRelationship():
public MainForm()
{
    InitializeComponent();

    // Get connection string from *.config file.
    cnStr =
        ConfigurationManager.ConnectionStrings[
        "AutoLotSqlProvider"].ConnectionString;

    // Create adapters.
    invTableAdapter = new SqlDataAdapter("Select * from Inventory", cnStr);
    custTableAdapter = new SqlDataAdapter("Select * from Customers", cnStr);
    ordersTableAdapter = new SqlDataAdapter("Select * from Orders", cnStr);

    // Autogenerate commands.
    sqlCBInventory = new SqlCommandBuilder(invTableAdapter);
    sqlCBOrders = new SqlCommandBuilder(ordersTableAdapter);
    sqlCBCustomers = new SqlCommandBuilder(custTableAdapter);

    // Fill tables in DS.
    invTableAdapter.Fill(autoLotDS, "Inventory");
    custTableAdapter.Fill(autoLotDS, "Customers");
    ordersTableAdapter.Fill(autoLotDS, "Orders");

    // Build relations between tables.
    BuildTableRelationship();

    // Bind to grids
    dataGridViewInventory.DataSource = autoLotDS.Tables["Inventory"];
    dataGridViewCustomers.DataSource = autoLotDS.Tables["Customers"];
    dataGridViewOrders.DataSource = autoLotDS.Tables["Orders"];
}
The BuildTableRelationship() helper function does the grunt work to add two DataRelation objects into the autoLotDS object. Recall from Chapter 21 that the AutoLot database expresses a number of parent/child relationships, which you can account for with the following code:
private void BuildTableRelationship()
{
    // Create CustomerOrder data relation object.
    DataRelation dr = new DataRelation("CustomerOrder",
        autoLotDS.Tables["Customers"].Columns["CustID"],
        autoLotDS.Tables["Orders"].Columns["CustID"]);
    autoLotDS.Relations.Add(dr);

    // Create InventoryOrder data relation object.
    dr = new DataRelation("InventoryOrder",
        autoLotDS.Tables["Inventory"].Columns["CarID"],
        autoLotDS.Tables["Orders"].Columns["CarID"]);
    autoLotDS.Relations.Add(dr);
}
Note that you establish a friendly string moniker with the first parameter when you create a DataRelation object (you’ll see the usefulness of doing so in just a minute). You also establish the keys used to build the relationship itself. Notice that the parent table (the second constructor parameter) is specified before the child table (the third constructor parameter).
Now that the DataSet has been filled with data from the data source, you can manipulate each DataTable locally. To do so, run the application and insert, update, or delete values from any of the three DataGridViews. When you are ready to submit the data back for processing, click the Update button. You should find it easy to follow along with the code behind the related Click event at this point:
private void btnUpdateDatabase_Click(object sender, EventArgs e)
{
    try
    {
        invTableAdapter.Update(autoLotDS, "Inventory");
        custTableAdapter.Update(autoLotDS, "Customers");
        ordersTableAdapter.Update(autoLotDS, "Orders");
    }
    catch (Exception ex)
    {
        MessageBox.Show(ex.Message);
    }
}
Now run your application and perform various updates. When you rerun the application, you should find that your grids are populated with the recent changes.
Now let’s look at how a DataRelation allows you to move between related tables programmatically. Extend your UI to include a new Button (named btnGetOrderInfo), a related TextBox (named txtCustID), and a descriptive Label (you can group these controls within a GroupBox for more visual appeal). Figure 22-12 shows one possible UI of the application.
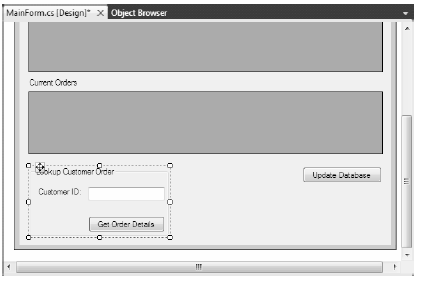
Figure 22-12 The updated UI allows the user to look up customer order information
This updated UI lets the user enter the ID of a customer and retrieve all the relevant information about that customer’s order (e.g., name, order ID, and car order). This information will be formatted into a string type that is eventually displayed within a message box. Consider the code behind the new Button’s Click event handler:
private void btnGetOrderInfo_Click(object sender, System.EventArgs e)
{
    string strOrderInfo = string.Empty;
    DataRow[] drsCust = null;
    DataRow[] drsOrder = null;

    // Get the customer ID in the text box.
    int custID = int.Parse(this.txtCustID.Text);

    // Now based on custID, get the correct row in Customers table.
    drsCust = autoLotDS.Tables["Customers"].Select(
        string.Format("CustID = {0}", custID));
    strOrderInfo += string.Format("Customer {0}: {1} {2}\n",
        drsCust[0]["CustID"].ToString(),
        drsCust[0]["FirstName"].ToString(),
        drsCust[0]["LastName"].ToString());

    // Navigate from Customers table to Orders table.
    drsOrder = drsCust[0].GetChildRows(autoLotDS.Relations["CustomerOrder"]);

    // Loop through all orders for this customer.
    foreach (DataRow order in drsOrder)
    {
        strOrderInfo += string.Format("----\nOrder Number:
            {0}\n", order["OrderID"]);

        // Get the car referenced by this order.
        DataRow[] drsInv = order.GetParentRows(autoLotDS.Relations[
            "InventoryOrder"]);

        // Get info for (SINGLE) car info for this order.
        DataRow car = drsInv[0];
        strOrderInfo += string.Format("Make: {0}\n", car["Make"]);
        strOrderInfo += string.Format("Color: {0}\n", car["Color"]);
        strOrderInfo += string.Format("Pet Name: {0}\n", car["PetName"]);
    }
    MessageBox.Show(strOrderInfo, "Order Details");
}
Figure 22-13 shows one possible output when specifying a customer ID with the value of 3 (this is Steve Hagen in my copy of the AutoLot database, who currently has two orders pending).
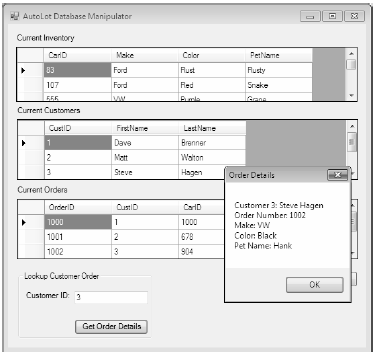
Figure 22-13 Navigating data relations
This last example should probably convince you of the usefulness of the DataSet class. Given that a DataSet is completely disconnected from the underlying data source, you can work with an in-memory copy of data and navigate around each table to make any necessary updates, deletes, or inserts without incurring any roundtrips to the database. Once you finish this, you can submit your changes to the data store for processing. The end result is a scalable and robust application.
Source Code You can find the MultitabledDataSetApp project under the Chapter 22 subdirectory.